Vuls: VULnerability Scanner

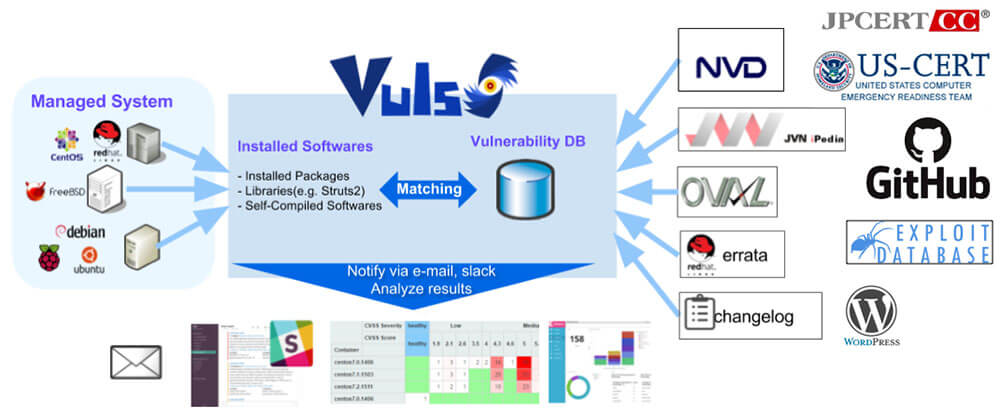
Vuls is an agentless vulnerability scanner for Linux and FreeBSD servers. It makes the job of every system administrator much easier by automatically scanning for vulnerabilities and then informing the system administrator which services and servers are affected.

Vuls: VULnerabillity Scanner
Vuls automatically scans through many different vulnerability databases including NVD, JVN and OVAL. This makes it easier for system administrators who must overlook servers which are running numerous software’s. After scanning the database, Vuls will generate a report which can be accessed through the GUI or a TUI. Vuls will give details about each vulnerability such as its severity level, description and released fixes. Vuls can also search for Non-OS packages and WordPress core, themes and plugins.
Features:
- Scan for all vulnerabilities in Linux and FreeBSD servers
- Vuls ensures a high-quality scan by scanning through multiple vulnerability servers
- Multiple scan modes are available depending on the resource availability of the server. These range from fast mode to deep mode (Fast Scan, Fast Root Scan, Remote and Local Scan, Server Mode)
- Dynamic and Static Analysis
- Scan vulnerability of Non-OS packages such as libraries of programming languages and network devices
- Scan through WordPress core, themes, plugins
Supported Platforms:
Requirements:
- Docker
- SQLite3, MySQL, PostgreSQL, Redis
- git
- gcc
- GNU Make
- go v1.13+ (The latest version is recommended)
Install
Linux Distros
Should work on Fedora based Linux distributions: CentOS, RedHat, Amazon Linux etc (tested on CentOS and Red Hat 7).
Install Docker:
$ sudo systemctl start docker
Clone Vulsctl and fetch vulnerability databases:
$ git clone https://github.com/vulsio/vulsctl.git
$ cd vulsctl
$ ./update-all.sh
Prepare config.toml in the same directory:
$ cat $HOME/vulsctl/config.toml
 [servers]
 [servers.hostos]
 host = "52.10.10.10"
 port = "22"
 user = "centos"
 keypath in the Vuls docker container
 keyPath     = "/root/.ssh/id_rsa"
SSH before scanning to add fingerprint to $HOME/.ssh/known_hosts on the Docker host:
$ ssh centos@52.100.100.100 -i ~/.ssh/id_rsa.pem
$ ./scan.sh
$ ./report.sh
$ ./tui.sh
Install With Docker
Run the following commands:
$ docker pull vuls/go-cve-dictionary
$ docker run --rm vuls/go-cve-dictionary –v
$ docker pull vuls/goval-dictionary
$ docker run --rm vuls/goval-dictionary –v
$ docker pull vuls/gost
$ docker run --rm vuls/gost -v
$ docker pull vuls/vuls
$ docker run --rm vuls/vuls -v
Usage
Local Scan Mode
Once you deployed Vuls, create a config file:
$ cd $HOME
$ cat config.toml

[servers] [servers.localhost]
host = "localhost"
port = "local"
Run the following command to start scan:
$ vuls scan
Reporting
To view one line summary:
$ vuls report -format-one-line-text
To view short summary:
$ vuls report -format-list
Full report:
$ vuls report -format-full-text | less
To run TUI (Terminal Based User Interface):
$ vuls tui
Remote Scan Mode (Ubuntu)
Step 1
Launch new Ubuntu Linux– Launch a new terminal and SSH to the Remote host.
– To add the remote host’s Host Key to $HOME/.ssh/known_hosts, you need to log in to the remote host through SSH before scanning.
Step 2
Enable to SSH from localhost– Vuls doesn’t support SSH password authentication. So you have to use SSH key-based authentication. Create a keypair on the localhost then append the public key to
authorized_keys on the remote host.
Localhost:
$ ssh-keygen -t rsa

# Copy ~/.ssh/id_rsa.pub to the clipboard.
Remote Host:
$ mkdir ~/.ssh
$ chmod 700 ~/.ssh
$ touch ~/.ssh/authorized_keys
$ chmod 600 ~/.ssh/authorized_keys
$ vim ~/.ssh/authorized_keys

# Paste from the clipboard to ~/.ssh/authorized_keys
$HOME/.ssh/known_hosts, you need to log in to the remote host through SSH before scanning.Localhost:
$ ssh ubuntu@172.31.4.82 -i ~/.ssh/id_rsa
Step 3
Configure (config.toml)$ cd $HOME $ cat config.toml [servers] [servers.ubuntu] host = "172.31.4.82" port = "22" user = "ubuntu" keyPath = "/home/centos/.ssh/id_rsa"
Check config.toml and settings on the server before scanning:
$ vuls configtest ubuntu
Start scanning:
$ vuls scan ubuntu
… snip …

One Line Summary
================
ubuntu  ubuntu16.04     30 updatable packages
Scan Using Docker
Prepare log directory:
$ cd /path/to/working/dir
$ mkdir go-cve-dictionary-log goval-dictionary-log gost-log go-exploitdb-log
Fetch various Vulnerability Directories:
$ for i in seq 2002 $(date +"%Y"); do \
     docker run --rm -it \
     -v $PWD:/vuls \
     -v $PWD/go-cve-dictionary-log:/var/log/vuls \
     vuls/go-cve-dictionary fetchnvd -years $i; \
   done

 $ docker run --rm -i \
     -v $PWD:/vuls \
     -v $PWD/gost-log:/var/log/gost \
     vuls/gost fetch redhat

 $ docker run --rm -i \
     -v $PWD:/vuls \
     -v $PWD/gost-log:/var/log/gost \
     vuls/gost fetch redhat

 $ docker run --rm -i \
     -v $PWD:/vuls \
     -v $PWD/go-exploitdb-log:/var/log/go-exploitdb \
     vuls/go-exploitdb fetch exploitdb
Create config.toml referring to this.
Configtest:
$ docker run --rm -it\
     -v ~/.ssh:/root/.ssh:ro \
     -v $PWD:/vuls \
     -v $PWD/vuls-log:/var/log/vuls \
     vuls/vuls configtest \
     -config=./config.toml # path to config.toml in docker
Scan:
$ docker run --rm -it \
     -v ~/.ssh:/root/.ssh:ro \
     -v $PWD:/vuls \
     -v $PWD/vuls-log:/var/log/vuls \
     -v /etc/localtime:/etc/localtime:ro \
     -e "TZ=Asia/Tokyo" \
     vuls/vuls scan \
     -config=./config.toml # path to config.toml in docker
If Docker host is Debian or Ubuntu:
$ docker run --rm -it \
     -v ~/.ssh:/root/.ssh:ro \
     -v $PWD:/vuls \
     -v $PWD/vuls-log:/var/log/vuls \
     -v /etc/localtime:/etc/localtime:ro \
     -v /etc/timezone:/etc/timezone:ro \
     vuls/vuls scan \
     -config=./config.toml # path to config.toml in docker


![Spamassasin Rainloop SPAM Filtering [Sieve] Spamassasin Rainloop SPAM Filtering [Sieve]](https://cdn.cyberpunk.rs/wp-content/uploads/2019/07/spamassassin_rainloop_bg-500x275.jpg)

