")
VPNs are an excellent way to protect your privacy – as long as they work properly, that is. If they suffer leaks, your privacy goes right out the window.
Unfortunately, as a Windows 10 user, you’re particularly susceptible to DNS leaks. That’s when your DNS queries (your connection requests to websites) leak outside the VPN tunnel. So what websites you visit isn’t a secret anymore.
We’ll tell you all about them in this article, and we’ll also show you how to fix them. If you’re in a hurry, though, skip to this collection of Windows 10 VPNs that have built-in leak protection.
Windows 10 Features That Cause DNS Leaks
According to our research and tests, Teredo and SHMNR are the features that cause VPN leaks:
Teredo
Teredo is a tunneling protocol that offers compatibility between IPv4 and IPv6 networks. Basically, it lets IPv4 connections communicate with IPv6 addresses by encapsulating IPv6 datagram packets within IPv4 UDP packets.
Overall, Teredo is very useful. And it’s just a temporary feature until full native IPv6 connectivity is achieved.
So what’s the problem then?
Well, the fact that it’s a tunneling protocol. Because of that, it can actually bypass the VPN tunnel sometimes. That usually happens when you use a VPN without leak protection or don’t disable IPv6. In that situation, IPv6 DNS requests might be made through Teredo instead of the VPN.
SMHNR
SMHNR stands for Smart Multi-Homed Name Resolution. Introduced in Windows 8, it’s a feature that’s supposed to speed up website load speeds.
It does that by sending out DNS queries to all available DNS servers. It then forces your computer to only accept responses from the fastest DNS server.
It’s convenient, but it can also cause DNS leaks.
Why?
Consider this – what’s the fastest DNS server usually?
Yes, your ISP’s server. So your DNS queries will go through it instead of your VPN provider’s unencrypted DNS server. So even though you’re using a VPN, your ISP will be able to see what sites you visit.
How Those Leaks Can Be Abused
Well, your ISP can easily take advantage of them. Since your DNS queries will leak out of the tunnel, they’ll monitor and log them. So they’ll know what you browse online, and they could share that information with advertisers for a profit.
Hackers could also abuse those leaks if you use public WiFi. Or if you accidentally connect to a fake hotspot set up by them.
Basically, they could use a packet sniffer, like Wireshark, to monitor your DNS queries. Then, they could use that information to run man-in-the-middle (MITM) attacks to redirect you to phishing sites.
For example, let’s say you use a VPN to access PayPal. Because you suffer DNS leaks, cybercriminals can see your DNS queries to paypal.com.
They then use that information to intercept your connection and redirect it to a fake site they set up called paypai.com. No red flags on your end because you wanted to end up on PayPal, so you go ahead and enter your login credentials.
Next thing you know, your account is emptied.
How to Test Your VPN for Leaks
- Use this tool without being connected to a VPN.
- Take a screenshot of the results.
- Connect to a VPN server.
- Use the tool again.
- Compare the results with the screenshot. If you see your original IP and DNS addresses, you’re dealing with a leak.
How to Fix VPN Leaks on Windows 10
Here are your options:
Disable Teredo
Open the Start menu, and search for the command prompt (type “cmd”). Don’t open it. Instead, right-click it and choose “Run as administrator.” That opens the elevated command prompt (with admin privileges) which is needed to successfully disable Teredo.

Next, type netsh interface teredo set state disabled in the command prompt. If you get an “Ok.” reply, you successfully disabled Teredo.
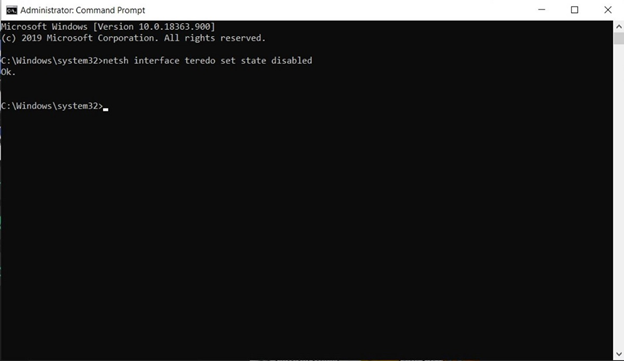
If you want to re-enable it, type netsh interface teredo set state type=default.
Some people say you can’t use the elevated command prompt if you have the Windows Home edition, so keep that in mind.
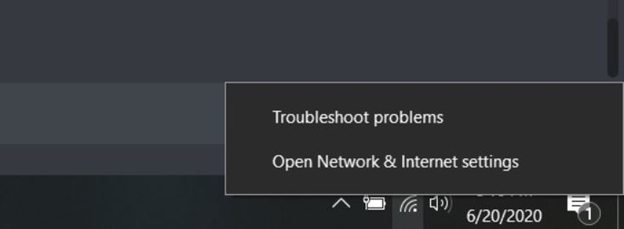
Disable IPv6
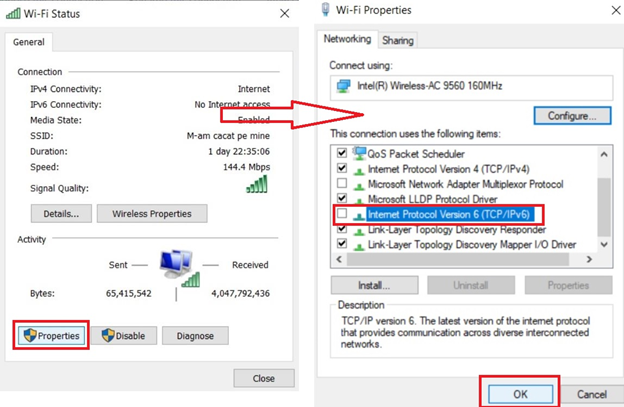
We recommend disabling IPv6 alongside Teredo. To do that, get to your network adapter (right-click the Network/WiFi icon and choose “Open Network & Internet settings”).
Then, click “Change adapter options.”

Next, double-click your network adapter, and hit “Properties.” Now, uncheck the “Internet Protocol Version 6 (TCP/IPv6)” option and click “OK.”
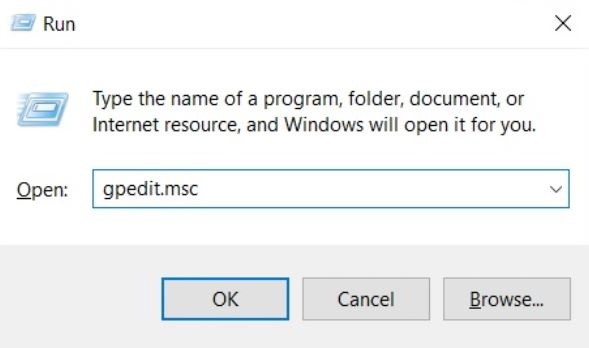
Disable SHMNR
You can only do this in Windows 10 through Local Group Policy Editor. To start, type “gpedit.msc” in the Run command box (Win + R).
On the left, go to Administrative Templates > Network > DNS Client. Double-click “Turn off smart multi-homed name resolution” on the right.
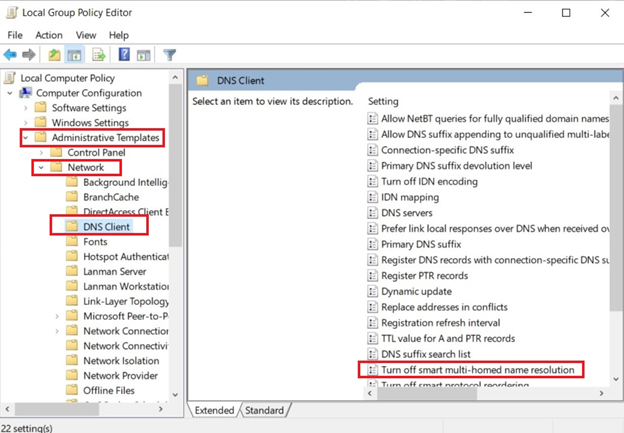
Switch it to “Enabled,” and click “Apply” and then “OK.”
Use the OpenVPN Plugin
Using the OpenVPN client? There’s a plugin that solves the DNS leaks caused by SMHNR.
If you’re running OpenVPN 2.3.9, just use this command: block-outside-dns.
If you don’t have the latest version, do this:
- Download fix-dns-leak-64.dll (64-bit systems) or fix-dns-leak-32.dll (32-bit systems).
- Open your OpenVPN configuration file, and add
these lines:
- plugin fix-dns-leak-64.dll (64-bit systems)
- plugin fix-dns-leak-32.dll (32-bit systems)
Get a VPN with Leak Protection
Instead of dealing with all that hassle, you could just get a VPN that has built-in DNS leak protection, and either blocks or supports IPv6 addresses.
Finding one can be tough, so we recommend checking this collection of Windows 10 VPNs that are leak-proof from ProPrivacy.
Are There Any Windows 10 Updates That Fix VPN Leaks?
Not as far as we know. We haven’t found any updates addressing VPN leaks, Teredo, and SMHNR.
The only thing we did find was update KB4554349 from March 30th, 2020. It fixed connectivity issues for VPN or proxy users. Basically, they would no longer see a limited or no connection status while using a proxy or VPN.
So if you experience anything like that, install the update.
")
![BIND Compile and Setup with DNSTap [v9.1x]](https://cdn.cyberpunk.rs/wp-content/uploads/2019/04/bind_bg-500x275.jpg "BIND Compile and Setup with DNSTap [v9.1x]")
![CloudFront Over S3 [CDN]](https://cdn.cyberpunk.rs/wp-content/uploads/2019/09/cloudfront_over_s3_bg-500x275.jpg "CloudFront Over S3 [CDN]")