![How to Fix Bootloop Issue on Android [TWRP, Nexus 6P]](https://cdn.cyberpunk.rs/wp-content/uploads/2020/07/bootloop-issue-android-bg.jpg "How to Fix Bootloop Issue on Android [TWRP, Nexus 6P]")
We’ve recently acquired one of the Nexus 6P phones that “died”, ended up in bootloop, and we decided to restore it. Bootloop issue is usually attributed to some hardware (dead cores, connector issues, etc) or software issue (e.g. corrupt files), causing the device (e.g. cellphone) to [re]boot, but failing every time to do so. There are some suggestions you can try:
Soft ResetAndroid : Turn off the phone, remove the battery and wait for 5-10 minutes before powering it–
Factory Reset : Wipe everything, go into recovery mode and start everything from scratch– Use some custom recovery like CWM (ClockWorkMode) or TWRP (TeamWinRecoveryProject)
Here we’re going to roughly cover a recovery via TWRP, for the sake of an example conducted on Nexus 6P cellphone with bootloop issue. Before we continue, we’ll list a few things you might need need:
– N2G48B_4Cores.img : boot.img from latest 7.1.2 firmware (modified to use only 4 cores
– twrp3_1_1_4Cores.img : TWRP 3.1.1, modified to use only 4 cores
= angler-n2g48b-factory-34c51cad.zip : Android 7.1.2 Factory Image
Bootloop Issue on Nexus 6P
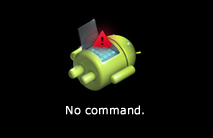
The phone wouldn’t boot. Trying to go into recovery mode didn’t yield any results. It was stuck on some “no command” / android dead icon (either static or blinking/flashing).
What caused it? Apparently, some fabrication issue releated to Snapdragon 810 v2.1 SoC (System on a Chip). A big.LITTLE CPU setup, where 4 smaller cores (ARM Cortex-A53 cores at 1.55 GHz, low power, slower) are being used for less intensive tasks while other 4 big cores (ARM Cortex-A57 cores at 1.95 GHz) are being used for demanding ones. The big cores simply stopped responding or had become “detached”.
The XCnathan32 found a workaround on this BLOD (Boot Loop of Death) issue by rewritting boot, kernel and recovery mode so they avoid any contact with the “big” cores (ever). Consequences of this vary, some might experience a drop in performance, others might get the same feel.
Unfortunatelly, if you didn’t unlock your cellphone and enable debugging before bootlooping, you couldn’t enable it later (you can’t reach settings). The “big.LITTLE” cores have a special relation, a safety mode built in, in which little cores take over the load of big cores when they’re overheated. So, a genial approach is to physically overheat the phone (e.g. hairdryer), targeting the location above fingerprint sensor, a rough location of Snapdragon 810 chip, causing the safe-guards to kick in. That might give you enough time to enable debugging or salvage some of the data.
Android Partitions
Before we continue, maybe a few words on android partitions:
– /system : Contains entire OS, kernel, ramdisk, UI, apps.
– /recovery : alternative boot partition that lets you go into recovery console (default, CWM, TWRP)
– /data : user’s data, contacts, messages, settings, apps. Formatting this partition essentially performs a factory reset
– cache : frequently accessed data and app components
– /misc : various system settings, CID, USB configuration, hardware settings
– /sdcard : storage space, media, documents
– /sd-ext
Flash Nexus 6P
First get things ready on your computer. Install ADB & fastboot (Debian):
$ sudo apt-get install android-tools-adb android-tools-fastboot
or on windows use Android SDK. Enter bootloader by holding the Power + Volume Down buttons. If you’re dealing with the working phone, you can run bootloader via adb:
$ adb reboot bootloader
Connect the cellphone and run:
$ fastboot devices

or

c:\Users\UnKnown\AppData\Local\Android\sdk\platform-tools>fastboot.exe devices

ENU5T15B12000686        fastboot
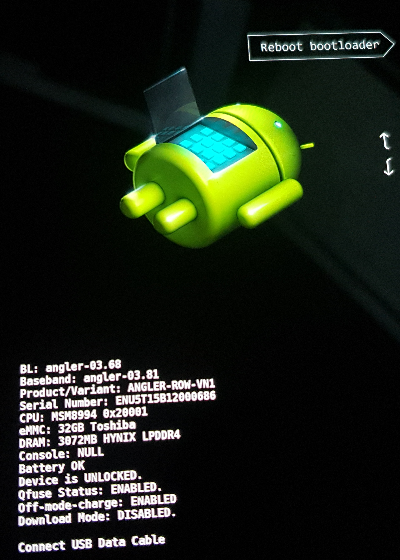
$ fastboot flashing unlock
…
(bootloader) Device already unlocked!
FAILED (remote failure)
finished. total time: 0.028s

or

c:\Users\UnKnown\AppData\Local\Android\sdk\platform-tools>fastboot.exe flashing unlock
 (bootloader) Device already unlocked!
 FAILED (remote failure)
 Finished. Total time: 0.020s
When you unlock your device, on boot you’ll encounter “Your device software can’t be checked for corruption” message. This is normal to see when you have an unlocked bootloader.
If your device is not unlocked, you’ll have to apply dirty solution we mentioned before in order for you to access your phone’s settings.
Start flashing things. While in bootloader mode, flash the factory image. If we take Nexus 6P model (3G RAM), there might be some memory issue when running “flash-all.sh“:
$ fastboot -w update image-angler-n2g48b.zip
…ending up with :
 angler-n2g48b$ ./flash-all.sh

 target reported max download size of 494927872 bytes
 sending 'bootloader' (3544 KB)…
 OKAY [  0.118s]
 writing 'bootloader'…
 OKAY [  0.204s]
 finished. total time: 0.322s
 rebooting into bootloader…
 OKAY [  0.022s]
 finished. total time: 0.072s
 target reported max download size of 494927872 bytes
 sending 'radio' (48728 KB)…
 OKAY [  1.365s]
 writing 'radio'…
 OKAY [  2.222s]
 finished. total time: 3.588s
 rebooting into bootloader…
 OKAY [  0.022s]
 finished. total time: 0.072s
 extracting android-info.txt (0 MB)…
 extracting boot.img (12 MB)…
 target reported max download size of 494927872 bytes
 archive does not contain 'boot.sig'
 archive does not contain 'dtbo.img'
 archive does not contain 'dt.img'
 extracting recovery.img (17 MB)…
 archive does not contain 'recovery.sig'
 extracting system.img (2727 MB)…
 W/ziparchive(32464): Zip: unable to allocate  2860202756 bytes at offset 0 : No space left on device
 failed to extract 'system.img': I/O error
Manually, unzip it and flash them individually:
 unknown@HelionPrime:/angler-n2g48b/unzip$ fastboot flash system system.img
 target reported max download size of 494927872 bytes
 erasing 'system'…
 OKAY [  0.663s]
 sending sparse 'system' 1/6 (482611 KB)…
 OKAY [ 12.567s]
 writing 'system' 1/6…
 OKAY [  6.824s]
 sending sparse 'system' 2/6 (470319 KB)…
 OKAY [ 12.157s]
 writing 'system' 2/6…
 OKAY [  6.557s]
 sending sparse 'system' 3/6 (459404 KB)…
 OKAY [ 11.774s]
 writing 'system' 3/6…
 OKAY [  6.572s]
 sending sparse 'system' 4/6 (482319 KB)…
 OKAY [ 12.473s]
 writing 'system' 4/6…
 OKAY [  6.767s]
 sending sparse 'system' 5/6 (483326 KB)…
 OKAY [ 12.596s]
 writing 'system' 5/6…
 OKAY [  6.950s]
 sending sparse 'system' 6/6 (415185 KB)…
 OKAY [ 10.615s]
 writing 'system' 6/6…
 OKAY [  5.820s]
 finished. total time: 112.337s

 unknown@HelionPrime:/angler-n2g48b/unzip$ fastboot flash boot boot.img
 target reported max download size of 494927872 bytes
 sending 'boot' (12385 KB)…
 OKAY [  0.339s]
 writing 'boot'…
 OKAY [  0.186s]
 finished. total time: 0.525s

 unknown@HelionPrime:/angler-n2g48b/unzip$ fastboot flash vendor vendor.img
 target reported max download size of 494927872 bytes
 sending 'vendor' (194736 KB)…
 OKAY [  4.878s]
 writing 'vendor'…
 OKAY [  3.514s]
 finished. total time: 8.392s
Flash twrp3_1_1_4Cores.img, a TWRP modified version that uses only 4 cores:
$ fastboot flash boot N2G48B_4Cores.img
$ fastboot flash recovery twrp3_1_1_4Cores.img
Push EX4_1_1_4Cores.zip:
$ adb push EX4_1_1_4Cores.zip /sdcard/TWRP/
Go into recovery and install EX4_1_1_4Cores.zip.
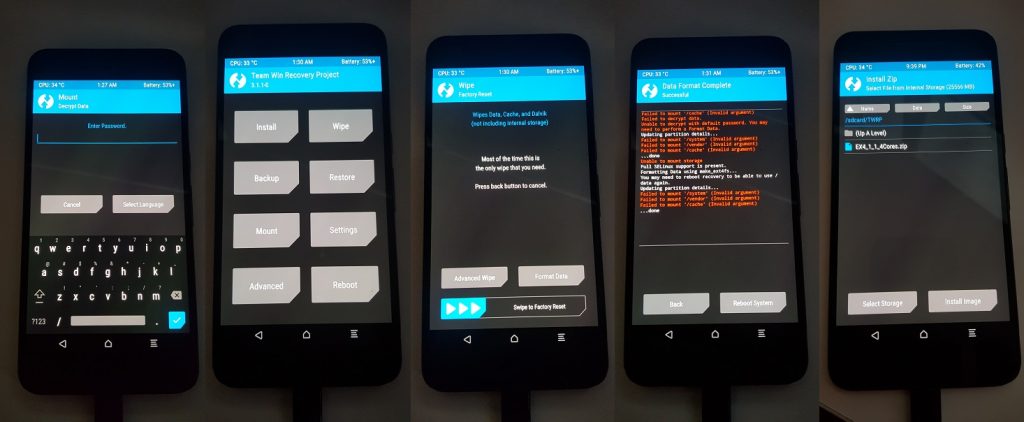
TWRP
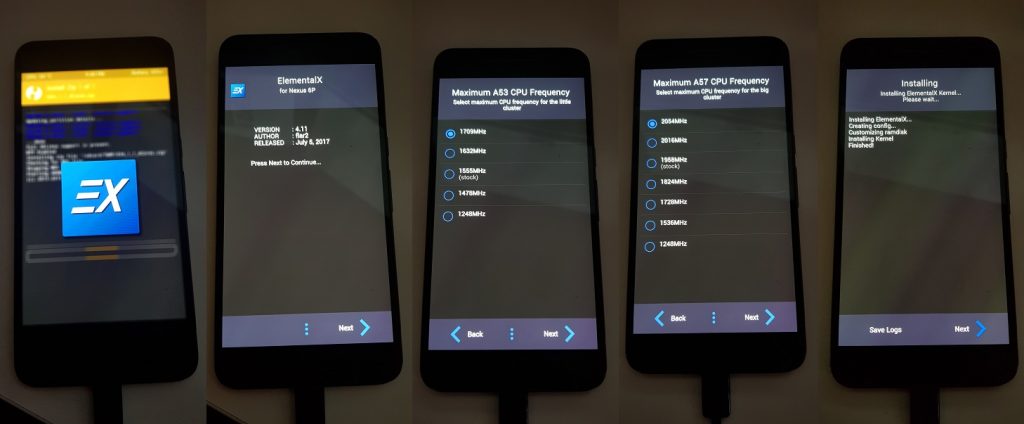
Elemental X
We already flash the images from fastboot, but you can do it from the TWRP as well.
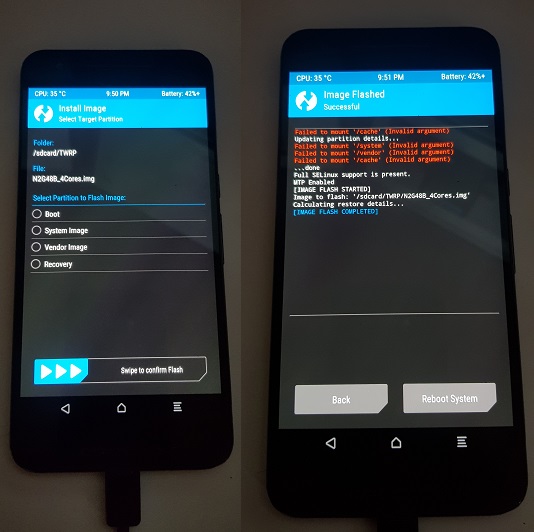
TWRP Flash
We could’ve capture some of the SS via:
$ adb exec-out screencap -p > screenshot.png
Recovery SS could be captured with some outside help (e.g. Recovery Screenshot) or play around with ADB and ffmpeg (mind your phone resolution and orientation):
$ adb pull /dev/graphics/fb0
$ ffmpeg -vcodec rawvideo -f rawvideo -pix_fmt rgba -s 720x1280 -i fb0 -f image2 -vcodec mjpeg -vframes 1 fb%d.jpg
Additional Issues
There might a chance you’ll end up with inability to access TWRP, trying to enter from bootloader into TWRP would lead you to a battery charging icon, battery not charging, things behaving “strange”, reboots, getting stuck, overall not behaving as you would expect. You could try (after TWRP flash):
- Get to bootloader (Volume down + Power)
- Go into recovery
- When “Exclamation mark” appears, press “Power” + “Volume up”
- You should end up in TWRP, but if you didn’t flash it, you could try wipe data/factory reset
Conclusion
Bootloop issue looked scary, but to our surprise, this was relatively straighforward process. Phone was up and running in no time, but that doesn’t mean you’re not going to experience any issues. You might end up with various problems, wrong images, versions, archives, etc. We would suggest trying out different things, making variations. There are vast amount of sources out there (websites, youtube guides, etc) that might help you, especially pointing out xda-developers.com.
![Raspberry Pi VNC [Remote Login]](https://cdn.cyberpunk.rs/wp-content/uploads/2018/09/vnc_rpi_back_bordo-500x275.jpg "Raspberry Pi VNC [Remote Login]")

